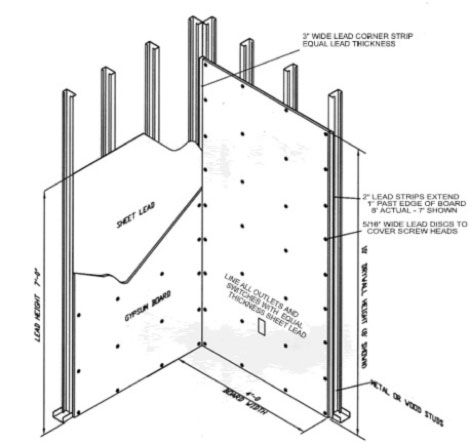
 Install leaded side of drywall/gypsum board, lath or plywood that will be used to cover the sheet lead against wooden or metal studs ensuring that you match the joints of the sheet lead used. Material must be in a vertical position with joints running from floor to ceiling as required by standards. Drill pilot holes as necessary to prevent deformation of fastener, lead or distortion of board. A minimum lead overlap of one inch is required at all joints and corners. Extend lead overhang at least one inch into all frames or openings. Sheet lead over 1/16″ thick should have a minimum 2″ overhang. Fastened to the wooden or metal studs, using proper drywall screws of the correct length. We suggest you use a minimum of 40 screws per 48″ x 84″ sheet. Spacing the screws at a maximum of 8″ on centre at the edges and a maximum of 12″ on centre at the intermediate studs. Screw drywall screws in deeper that normal into wall covering material slightly deeper than the thickness of the lead tab/disk or buttons been used. For drywall/Gypsum board or lath you may create a dimple over the screw head with a swing of your hammer head or other round ended tool to make a 1″ diameter impression. Finish by gluing with a construction adhesive the lead buttons usually a minimum of a 7/8″ disk over each screw head. After glue has dried out fill in and feather out with wood filler or plaster compound as needed to completely cover the screws and the protection disk devices.
MarShield recommends the use of drywall screws in all situations wherever possible. If using lead headed nails (on wood studs only), then ensure that you drive them to the proper depth and cover with drywall compound.
![]() Due to the extreme weight of lead lined drywall, extra care must be taken during handling, storage and installation. Be sure to have any installed shielding tested by approved personnel.
Due to the extreme weight of lead lined drywall, extra care must be taken during handling, storage and installation. Be sure to have any installed shielding tested by approved personnel.
Typical Details for Lead Lined Drywall:

Available in 48 Inch Width
Sample Leaded Drywall Weights
- Drywall 1/2″ thick with 1/32″ thick lead = 3.575 pounds per square foot
- Drywall 5/8″ thick with 1/32″ thick lead = 4.75 pounds per square foot
- Drywall 5/8″ thick with 1/16″ thick lead = 6.05 pounds per square foot
- Drywall 5/8″ thick with 3/32″ thick lead = 8.65 pounds per square foot
Drywall 5/8″ thick with 1/8″ thick lead = 9.8 pounds per square foot
If laying sheet lead directly over existing concrete floor then coat fully cured concrete with a sealant like varnish to prevent chemical interaction between the concrete and lead and let the sealant or varnish fully dry. Ensure the lead is free of bumps, air pockets or obstructions and lies completely flat. It is recommended before securing lead to floor that a small sample area be done first to ensure adhesion with the varnish or sealant coating. Use a construction adhesive on hard to secure spots or areas. Press or roll the sheet lead completely flat on the floor.
Prior to laying carpeting, or tile covering we recommend applying an underlay sub floor consisting of a 1/4″ or heavier approved plywood or other firm solid material over the Sheet Lead. Fastened down the material with a good quality construction adhesive. Performing this extra step will help spread the floor loading out over a wider area eliminating point loading that could deform the sheet lead below. Alternatively floor anchor bolts countersunk can be used if lead buttons are used over each anchor point.
The lead protection may be obtained in two ways. If possible, it is simplest to lay sheet Lead on top of the floor slab above, allowing it to extend out at least 8″ in every direction beyond the lead walls below it.
![]() For health and safety reasons it is recommend there be no exposed lead after your installation is completed. Disposal of all scrap lead must be handled in a proper environmentally & responsible manner. Check with your local by-laws for the proper way of disposing of the remaining scrap lead material. Installation should comply with requirements of local, regulatory agencies and standards specified.
For health and safety reasons it is recommend there be no exposed lead after your installation is completed. Disposal of all scrap lead must be handled in a proper environmentally & responsible manner. Check with your local by-laws for the proper way of disposing of the remaining scrap lead material. Installation should comply with requirements of local, regulatory agencies and standards specified.
The information provided on this page should only be used as a general guideline. MarShield makes no guarantees or warranties to its accuracies. Most states or provinces have their own local by-laws, provincial, state or federal guidelines on installation & construction practices, radiation protection and proper materials to be used. Marshield assumes no liability for sheet lead installation and strongly advises that you consult with your local authorities and/or by-laws before you begin your construction project.
Lead Drywall Installation Information